

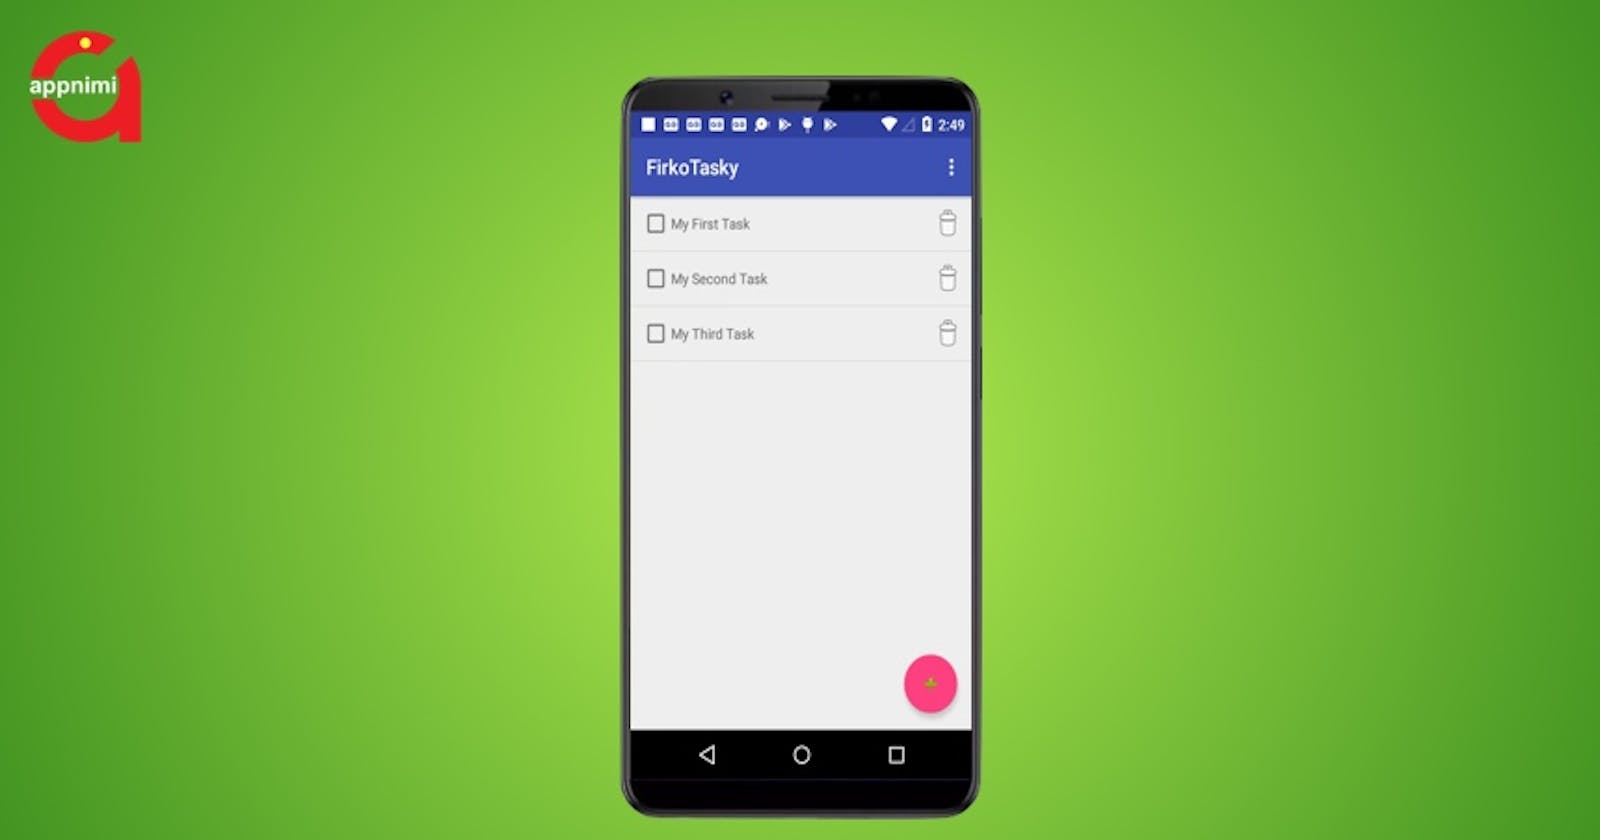
Firebase Realtime Database and Kotlin Tutorial - Develop Cloud Based Task List App


In this tutorial, you are going to learn about Firebase Realtime Database and Kotlin for Android. You will learn all these while developing a simple Cloud based Task List app.
What will you learn in this Tutorial
- Connect Firebase in Android Studio?
- Add Firebase Realtime Database support to your project?
- Use Firebase Realtime Database for persistence in your app?
- Use Kotlin for Android App Development?
Definitions
Here are the definitions of the some of the Terminologies and Technologies used in this Firebase Realtime Database and Kotlin Tutorial.
What is Firebase?
Firebase is Google's mobile platform that helps you quickly develop high-quality apps and grow your business.
What is Firebase Database?
The Firebase Realtime Database is a cloud-hosted database. Data is stored as JSON and synchronized in realtime to every connected client.
What is Kotlin?
Kotlin is now an official language on Android. It's expressive, concise, and powerful. Best of all, it's interoperable with our existing Android languages and runtime.
Kotlin is concise while being expressive. It contains safety features for nullability and immutability, to make your Android apps healthy and performant by default.
Prerequisites
Here are the pre-requisites for the Firebase Realtime Database and Kotlin.
- Android Studio
- Firebase Console
- Android Mobile with Internet(Recommended but not mandatory)
Get Source Code
You can get the source file with the complete project files for the Firebase Realtime Database and Kotlin. Go ahead and click the below button to get the files. [activecampaign form=91]
Get Started with Firebase Realtime Database and Kotlin
To get started with the tutorial you will need to first create a Android project.
Create a Project in Android Studio
Here are the steps to create a project in Android Studio.
Create Android Project
- Goto File>New>New Project
- Set Application Name as "FirkoTasky" (FirebasekotlinTasky)
- Set Company domain as "appnimiacademy.com".
- Set Project Location as a convenient folder on your computer.
- Leave the Package Name as it is.
- Ensure that the "Include Kotlin Support" is checked.
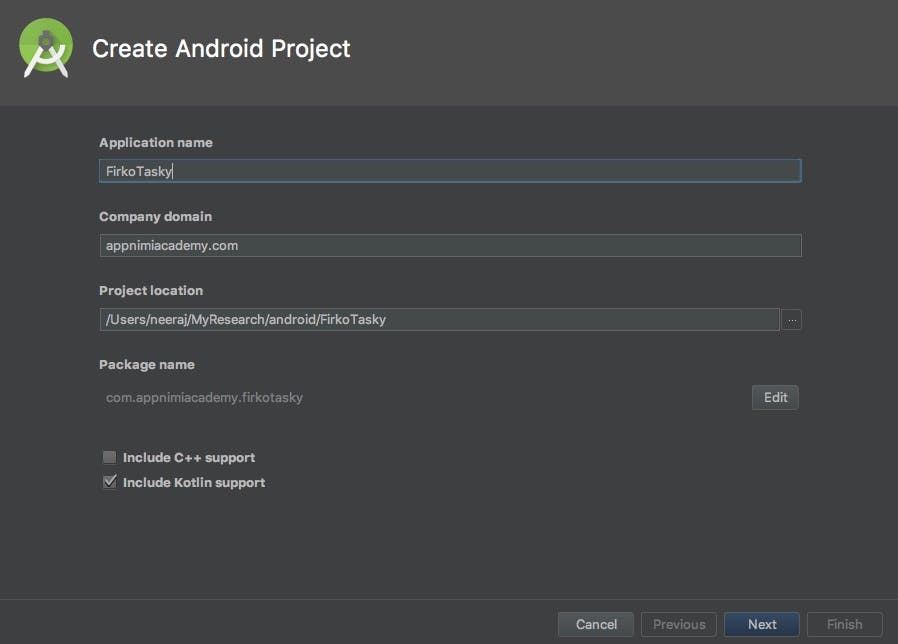
NOTE: Through out this tutorial I will be using appnimiacademy in the package name. You can replace it with your own domain name.
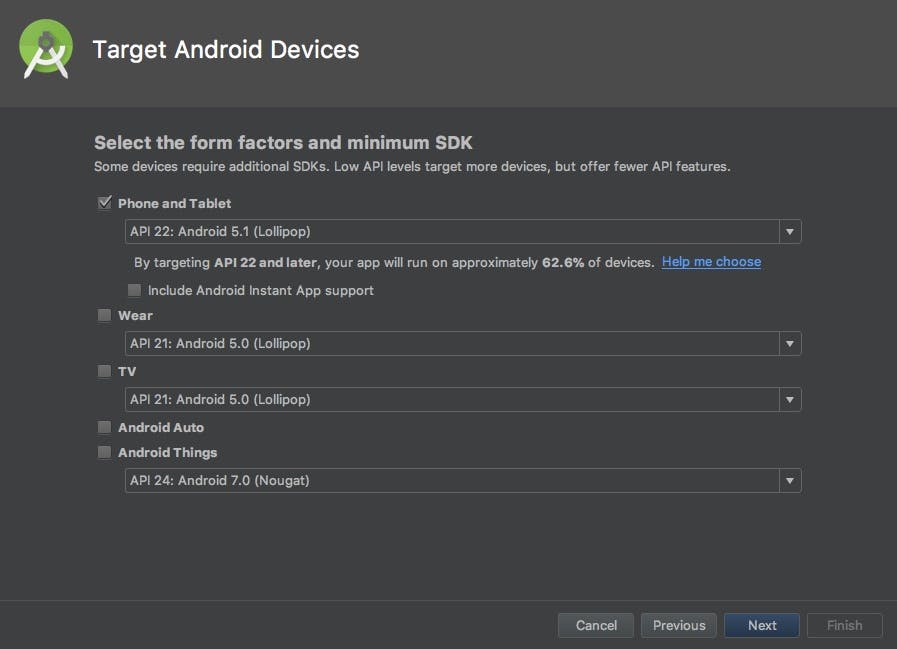
Target Android Devices
Set Target Android Devices.
- Check the Phone and Tablet option.
- You can uncheck the "Include Android App Support" option.
- Uncheck other options as they are not required for this tutorial.
- Click on Next.
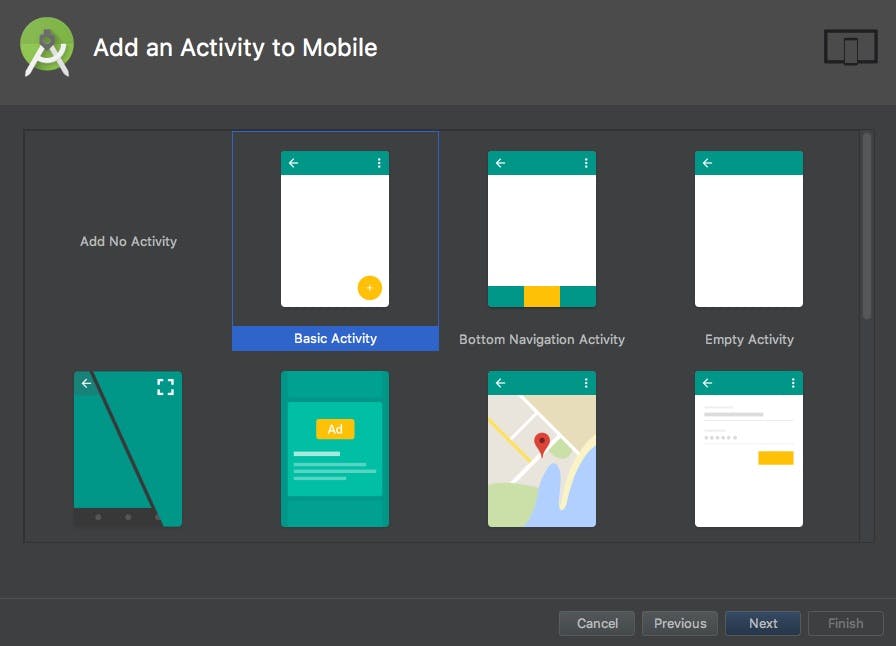
Add Activity
- Choose "Basic Activity" as the template for the activity.
- Click on Next.
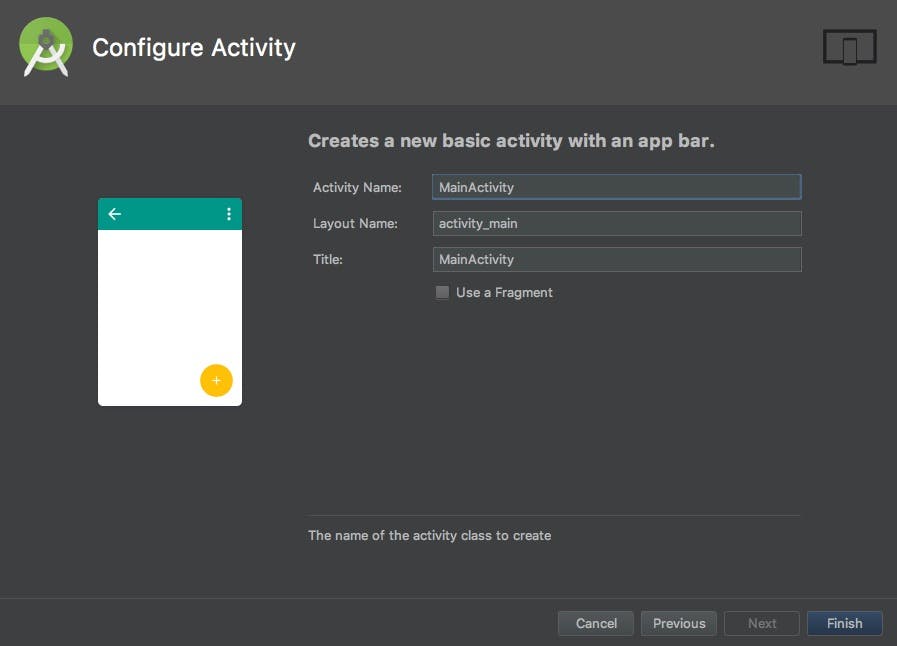
Configure Activity
- Leave Activity name as default (MainActivity)
- Leave Layout name as default (activity_main)
- Leave Title as default (MainActivity)
- Click on Finish
This is how the Android Studio should look like once the project has been created.

Add the components to the Main Acivity
To get started we will need to add the components to the Main Activity which are required for our FirkoTasky app.
Add New Task Form in the Footer
Now let us go ahead and add a footer section at the bottom of the main activiy. It will contain the TextField and a Button to add a Task to the List.
Add a Relative Layout
Now go ahead and replace the whole TextView Tag in the "content_main.xml" with the the following code.
<RelativeLayout
    android:id="@+id/footer"
    android:layout_width="match_parent"
    android:layout_height="wrap_content"
    android:orientation="horizontal"
    app:layout_constraintBottom_toBottomOf="parent"
    android:background="@color/colorPrimary"
    android:visibility="gone"
    android:layout_alignParentBottom="true">
</RelativeLayout>
In the above code
- We are adding a RelativeLayout.
- There are some layout contstraints for aligments.
- Make sure you set the android id as shown in the code, otherwise it can lead to unexpected behaviours.
- Initially the New Task Form will be hidden thus the visibility is set as gone.
Add a Image Button to the Relative Layout
Now add a button to the Relative Layout. We will use this button to add a new task to the task list.
Add the following code inside the Relative Layout tag added above.
<ImageButton
    android:id="@+id/btnAdd"
    android:layout_width="wrap_content"
    android:layout_height="wrap_content"
    android:layout_alignParentEnd="true"
    android:layout_alignParentRight="true"
    android:layout_centerVertical="true"
    android:background="@android:color/transparent"
    android:gravity="end"
    app:srcCompat="@android:drawable/ic_menu_save" />
Add a Text Field for New Task
Now add the following piece of code just above the ImageButton Tag inside the RelativeLayout.
<EditText
    android:id="@+id/txtNewTaskDesc"
    android:layout_width="match_parent"
    android:layout_height="wrap_content"
    android:layout_toLeftOf="@+id/btnAdd"
    android:layout_centerVertical="true"
    android:textColor="@android:color/white"
        ></EditText>
Add a ListView to show the Task List
Now you will need to add a ListView so that you can show all the exisiting Tasks in the Task List. To that paste the following code just above the Relative Layout added in the previous section.
<ListView
    android:id="@+id/listviewTask"
    android:layout_width="match_parent"
    android:layout_height="match_parent"
    app:layout_constraintBottom_toTopOf="@+id/footer"
    app:layout_constraintBottom_toBottomOf="parent"
    app:layout_constraintLeft_toLeftOf="parent"
    app:layout_constraintRight_toRightOf="parent"
    android:layout_alignParentTop="true"
    />
Completed content_main.xml
The whole xml will look like as below
<?xml version="1.0" encoding="utf-8"?>
<android.support.constraint.ConstraintLayout xmlns:android="http://schemas.android.com/apk/res/android"
    xmlns:app="http://schemas.android.com/apk/res-auto"
    xmlns:tools="http://schemas.android.com/tools"
    android:layout_width="match_parent"
    android:layout_height="match_parent"
    app:layout_behavior="@string/appbar_scrolling_view_behavior"
    tools:context=".MainActivity"
    tools:showIn="@layout/activity_main">

    <ListView
        android:id="@+id/listviewTask"
        android:layout_width="match_parent"
        android:layout_height="match_parent"
        app:layout_constraintBottom_toTopOf="@+id/footer"
        app:layout_constraintBottom_toBottomOf="parent"
        app:layout_constraintLeft_toLeftOf="parent"
        app:layout_constraintRight_toRightOf="parent"
        android:layout_alignParentTop="true"
        />

    <RelativeLayout
        android:id="@+id/footer"
        android:layout_width="match_parent"
        android:layout_height="wrap_content"
        android:orientation="horizontal"
        app:layout_constraintBottom_toBottomOf="parent"
        android:background="@color/colorPrimary"
        android:visibility="gone"
        android:layout_alignParentBottom="true">

        <EditText
            android:id="@+id/txtNewTaskDesc"
            android:layout_width="match_parent"
            android:layout_height="wrap_content"
            android:layout_toLeftOf="@+id/btnAdd"
            android:layout_centerVertical="true"
            android:textColor="@android:color/white"
                ></EditText>

        <ImageButton
            android:id="@+id/btnAdd"
            android:layout_width="wrap_content"
            android:layout_height="wrap_content"
            android:layout_alignParentEnd="true"
            android:layout_alignParentRight="true"
            android:layout_centerVertical="true"
            android:background="@android:color/transparent"
            android:gravity="end"
            app:srcCompat="@android:drawable/ic_menu_save" />

    </RelativeLayout>

</android.support.constraint.ConstraintLayout>
Row XML for Task ListView
The next component which we need to add is the rows for the Task in the list.
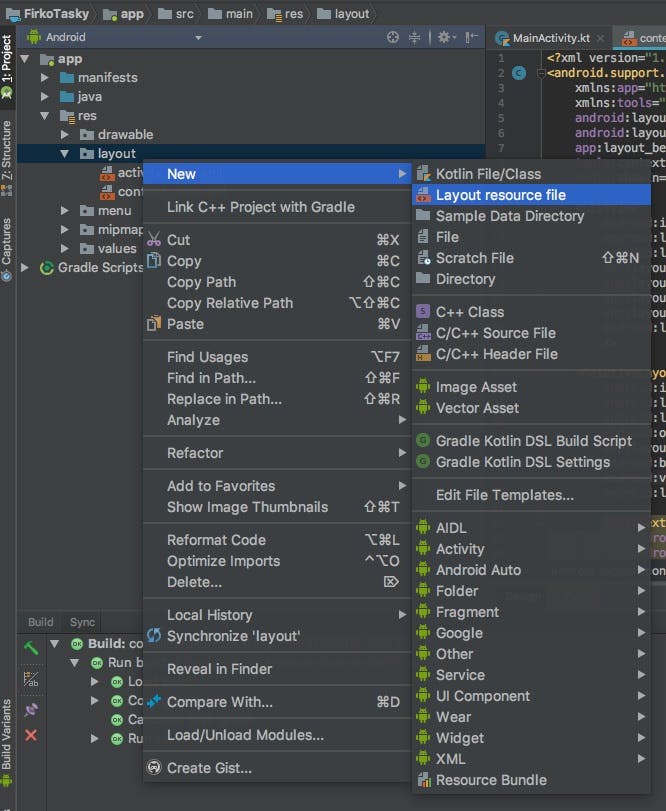
Create a Layout Resource File
So let us go ahead and add a resource xml.
- Goto to the Project Tab.
- Goto to the Layout Folder.
- Right Click on the Layout Folder.
- Select New.
- Select Resource File.
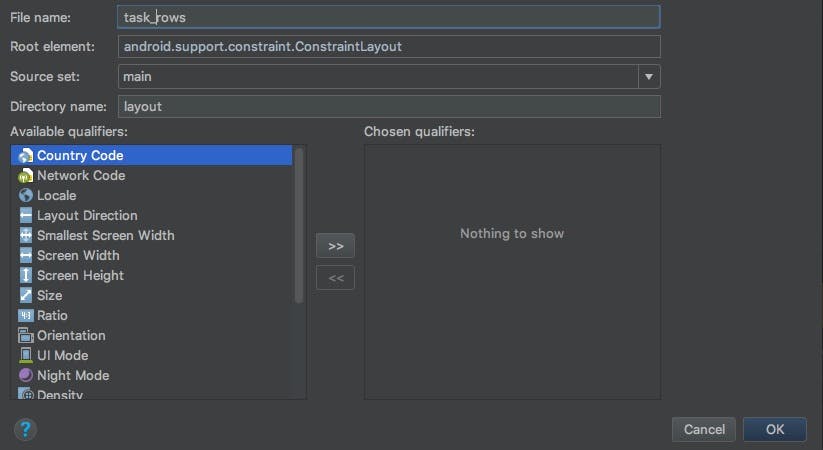
- Set the name as task_rows.
- Leave everything else as default.
Change the Layout to Relative Layout
We are going to use Relative Layout for this xml. So go ahead replace the exisiting code for the layout with the following.
<RelativeLayout xmlns:android="http://schemas.android.com/apk/res/android"
    xmlns:app="http://schemas.android.com/apk/res-auto"
    android:layout_width="match_parent"
    android:layout_height="wrap_content"
    android:orientation="horizontal"
    android:padding="10dp">

</RelativeLayout>
Add a Checkbox to Track Task Completion
We will need a checkbox to show whether a task has been completed or not.
Paste the following code inside the Relative Layout added above.
<CheckBox
    android:id="@+id/chkDone"
    android:layout_width="wrap_content"
    android:layout_height="wrap_content" />
Add a TextView for Task Description
The textview will contain the description of the Task. It will be aligned to the right of the Checkbox. Paste the following code below Checkbox in the Relative Layout.
<TextView
    android:id="@+id/txtTaskDesc"
    android:layout_width="wrap_content"
    android:layout_height="wrap_content"
    android:layout_centerVertical="true"
    android:layout_toEndOf="@+id/chkDone"
    android:layout_toRightOf="@+id/chkDone"
    android:text="Item Text"

    />
Add Button to Remove a Task
Add an image button to remove or delete a Task. Paste the following code below the TextView tag and inside the Relative Layout in the layout xml.
<ImageButton
    android:id="@+id/btnRemove"
    android:layout_width="wrap_content"
    android:layout_height="wrap_content"
    android:layout_alignParentEnd="true"
    android:layout_alignParentRight="true"
    android:layout_centerVertical="true"
    android:background="@android:color/transparent"
    android:gravity="end"
    app:srcCompat="@android:drawable/ic_menu_delete" />
Completed task_rows.xml
Here is the completed xml:
<?xml version="1.0" encoding="utf-8"?>
<RelativeLayout xmlns:android="http://schemas.android.com/apk/res/android"
    xmlns:app="http://schemas.android.com/apk/res-auto"
    android:layout_width="match_parent"
    android:layout_height="wrap_content"
    android:orientation="horizontal"
    android:padding="10dp">

    <CheckBox
        android:id="@+id/chkDone"
        android:layout_width="wrap_content"
        android:layout_height="wrap_content" />

    <TextView
        android:id="@+id/txtTaskDesc"
        android:layout_width="wrap_content"
        android:layout_height="wrap_content"
        android:layout_centerVertical="true"
        android:layout_toEndOf="@+id/chkDone"
        android:layout_toRightOf="@+id/chkDone"
        android:text="Item Text"

        />

    <ImageButton
        android:id="@+id/btnRemove"
        android:layout_width="wrap_content"
        android:layout_height="wrap_content"
        android:layout_alignParentEnd="true"
        android:layout_alignParentRight="true"
        android:layout_centerVertical="true"
        android:background="@android:color/transparent"
        android:gravity="end"
        app:srcCompat="@android:drawable/ic_menu_delete" />

</RelativeLayout>
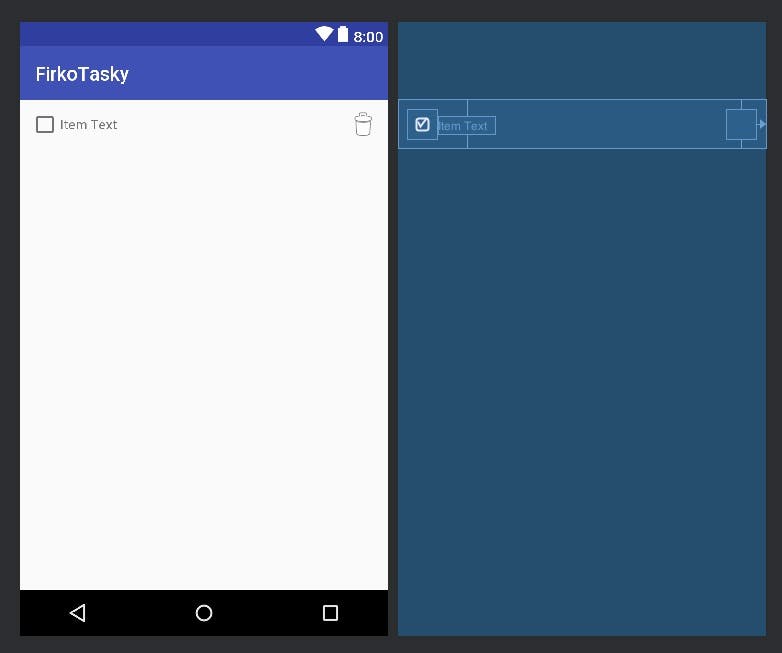
This is how the Design Tab will look like for the task_rows.xml:
Floating Button
We will show the footer when the user taps the Floating Button. Also we will need to change the the icon of button.
Change the Image of the Floating Button to a "+" icon
- Goto activity_main.xml.
- Find ic_dialog_email.
- Replace with ic_input_add.
The floating button tag will look like ths:
<android.support.design.widget.FloatingActionButton
    android:id="@+id/fab"
    android:layout_width="wrap_content"
    android:layout_height="wrap_content"
    android:layout_gravity="bottom|end"
    android:layout_margin="@dimen/fab_margin"
        app:srcCompat="@android:drawable/ic_input_add" />
Add Action Handler for Floating Button
When you goto the MainActivity.kt, you will find that there is already an action handler for the fab button. It shows a snacbar at the bottom.
fab.setOnClickListener { view ->
    Snackbar.make(view, "Replace with your own action", Snackbar.LENGTH_LONG)
            .setAction("Action", null).show()
}
We are going to replace this action with a call to one of our own function.
First go ahead and add a Function to showFooter. Add the following function to MainActivity.kt
fun showFooter(){
    footer.visibility = View.VISIBLE
    fab.visibility = View.GONE
}
In case you get compilations errors here, add the followin imports:
import android.view.View
import kotlinx.android.synthetic.main.activity_main.\*
import kotlinx.android.synthetic.main.content_main.\*
Now replace the OnClickAcionListner with the following code:
fab.setOnClickListener { view ->
    showFooter()
}
Run the App
Let us run the app and see where we have reached in our Firebase Realtime Database and Kotlin tutorial.
[video src="neerajjaiswal.com/wp-content/uploads/FirkoT.." height="470" width="282"][/video]
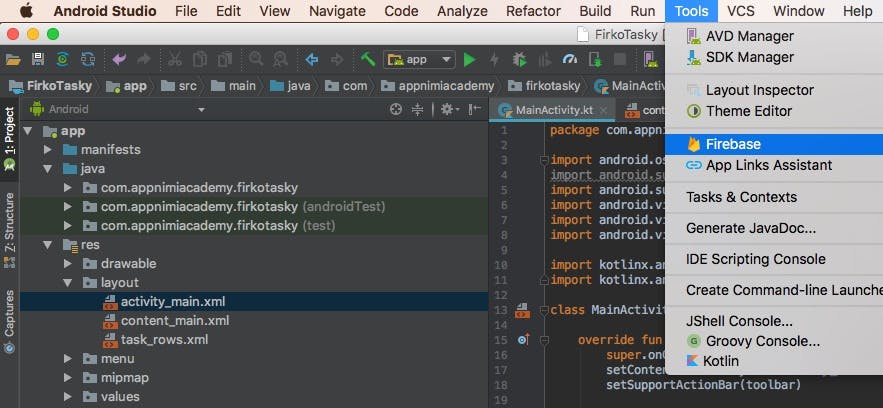
Firebase Integeration
To get started with Firebase for the project goto menu Tools>Firebase in the Android Studio.
Add Firebase
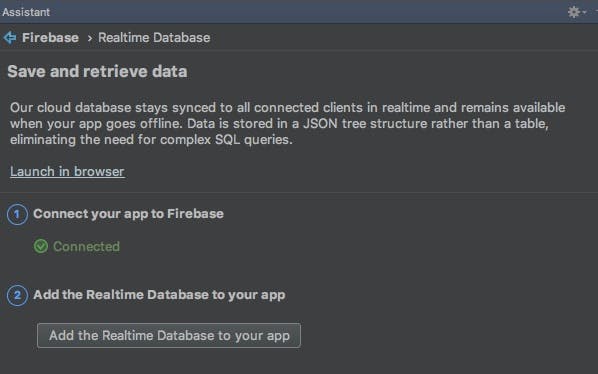
Once you click on it you will get the following wizard on the right. Expand the Firebase Relatime Database section and click on the Save and Retrive data link.
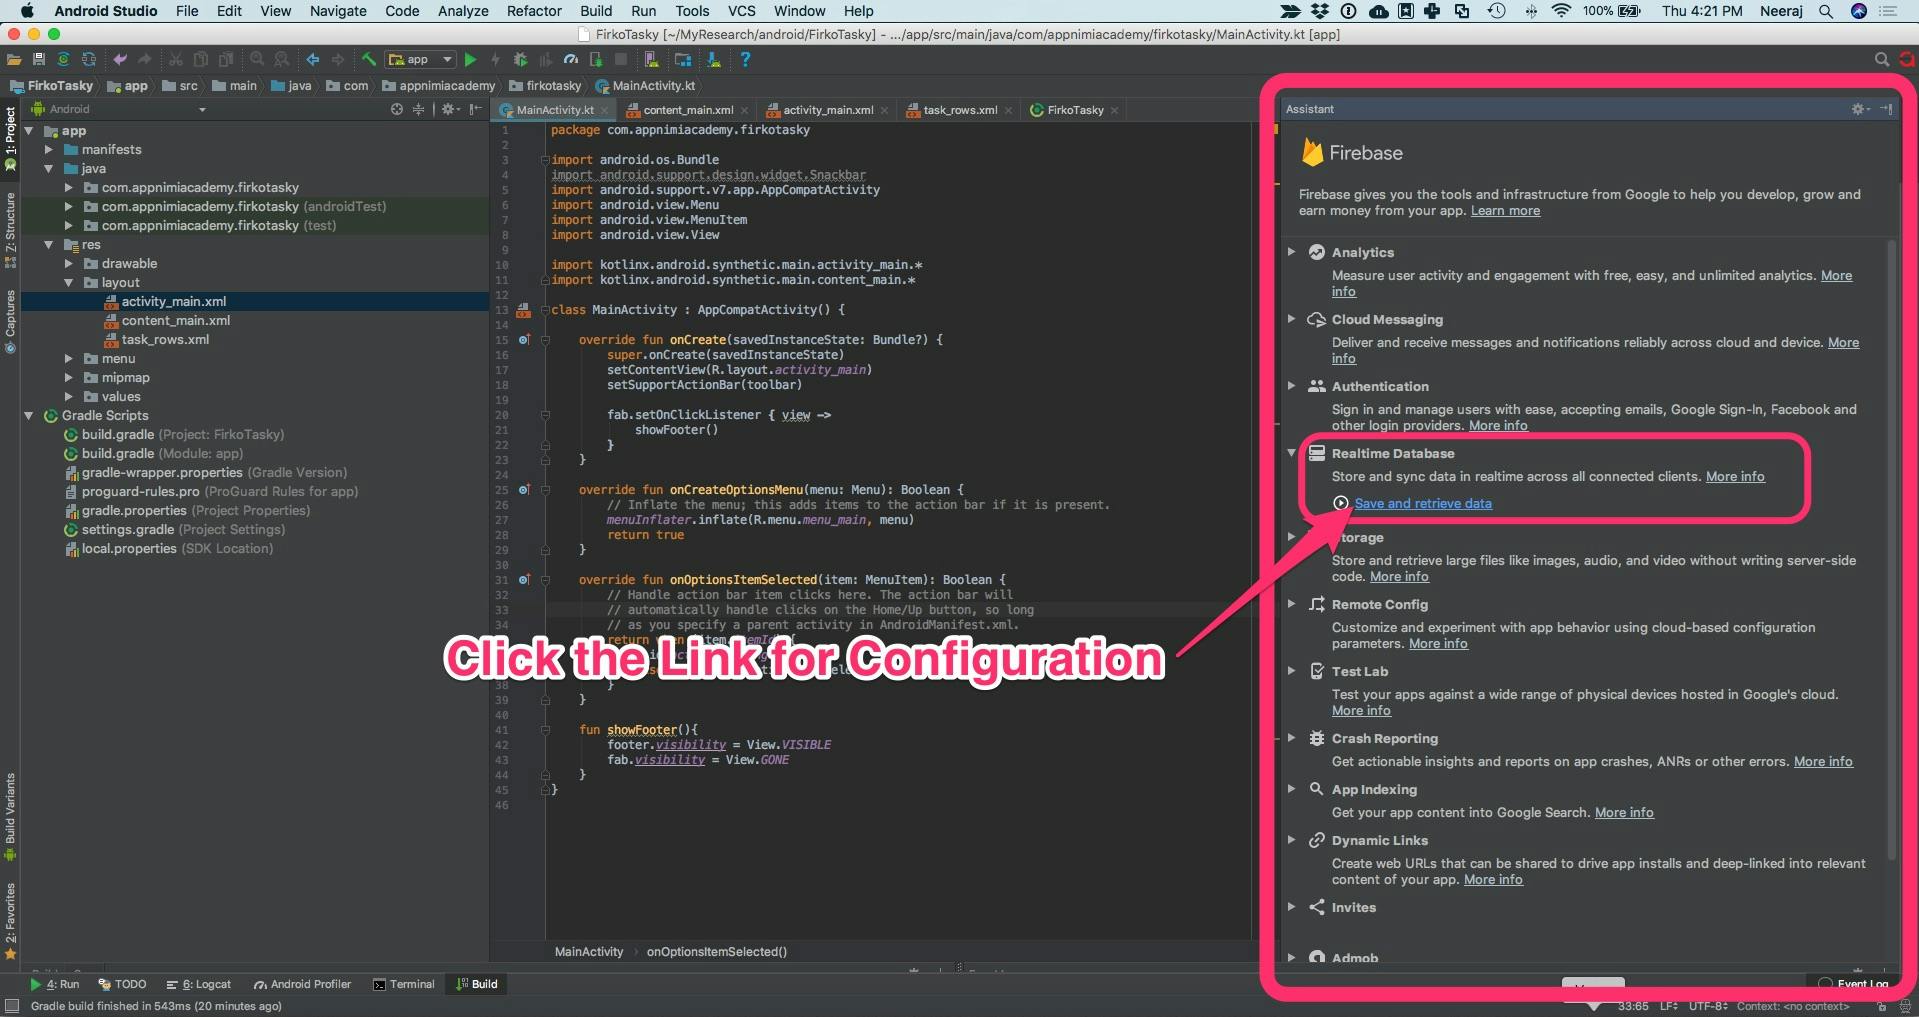
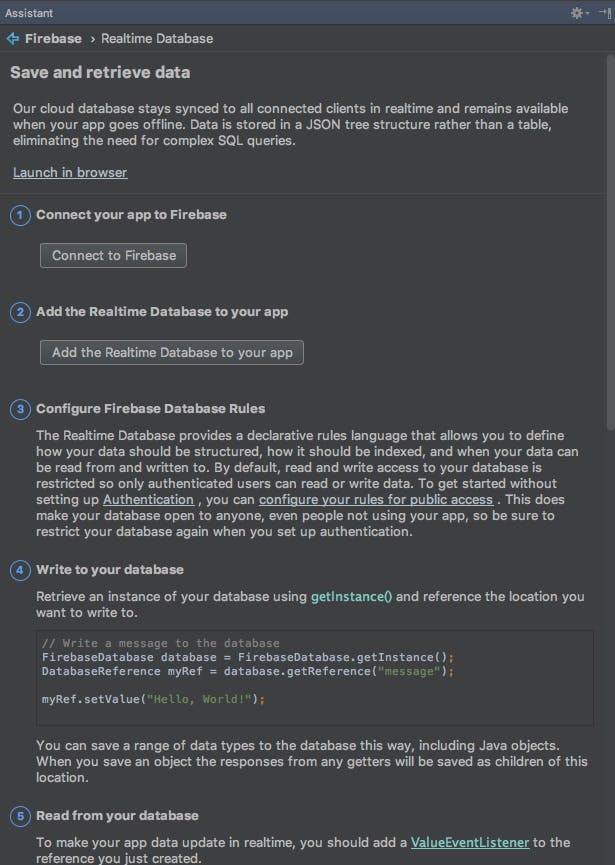
Once you click the link it will open the Firebase Realtime Database Assistant. The Wizard will look like following.
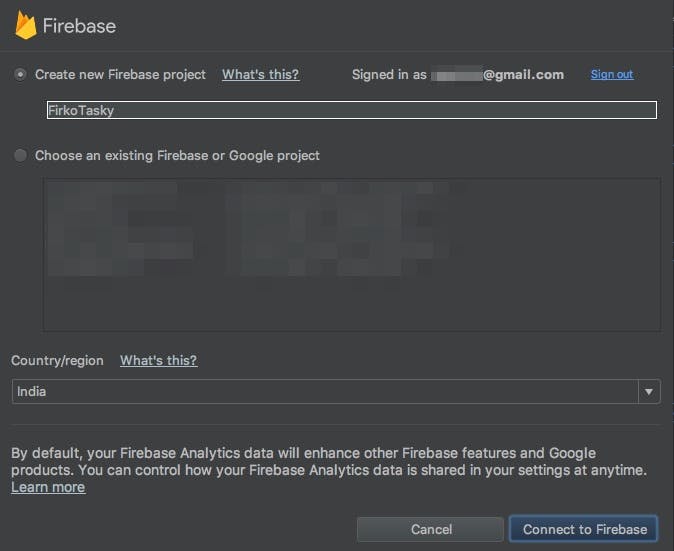
Connect to Firebase
Click on the Connect to Firebase button. Ensure that you are connected to the internet.
If you are already logged into you Firebase Console account in the Android Studio then you will get the following popup. If you are not logged in then it will ask you login to your Firebase Console.
Click on the Connect to Firebase button. Ensure that you are connected to internet. Sometimes you might get an error like below on the bottom right.
> Firebase: Connect to Firebase failed. Please check your internet connection and try again. If errors persist, you can connect manually at https://console.firebase.google.com
If you get something like, just click on the Connect to Firebase once more. If things go as expected this time then you will be shown the following popup.
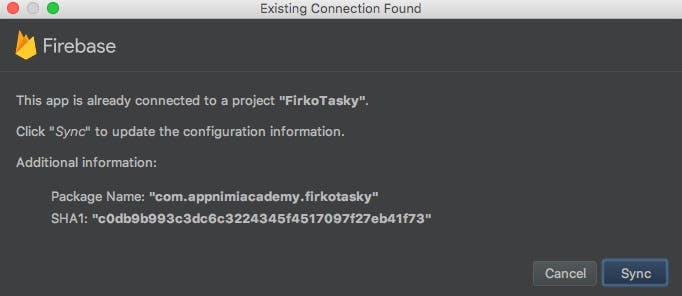
Just go ahead and click on Sync button. Once everything works as expected you will get a green text Connected mentioned on the Assistant as below.
Add Firebase Realtime Database Support
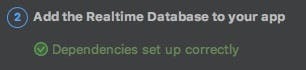
Next go ahead and click on the "Add the Realtime Database to your app" button. It will show you the following popup warning you about the changes to be made to gradle scripts.
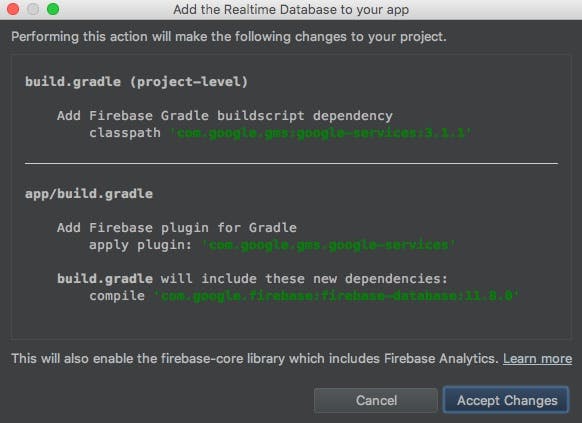
You go ahead and click on "Accept Changes". On Success you will see the following text in the Firebase Assistant tab.
Save New Task to Firebase Realtime Database
Let move ahead with the Tutorial now that we have the Firebase integerated into the app. In this section we will Save a new Task to the Real Time DB.
Create an Object Class for Task
We will need to have an Object class for Task in Kotlin, something similar to our good old POJO.

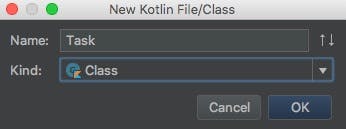
As shown above:
- Goto Project Tab.
- Goto Package "com.appnimiacademy.firkotasky".
- Right Click and Select New and then Select Kolin File/Class. A new popup will come up.
- Name the class as Task.
- Set Kind as Class.
- Click on OK.
Here is the Kotlin code for the class. Replace the code in the Task.kt file with the following.
package com.appnimiacademy.firkotasky

class Task {
    companion object Factory {
        fun create(): Task = Task()
    }

    var objectId: String? = null
    var taskDesc: String? = null
    var done: Boolean? = false
}
Create a Statics.kt to hold the statics
- Goto Project Tab.
- Goto Package "com.appnimiacademy.firkotasky".
- Right Click and Select New and then Select Kolin File/Class. A new popup will come up.
- Name the class as Statics.
- Set Kind as File.
- Click on OK.
- Replace the code in the file with the following code.
package com.appnimiacademy.firkotasky

object Statics {
    @JvmStatic val FIREBASE_TASK: String = "task"
}
Get Firebase Realtime Database Reference
Add the following line of code as Class variable in MainActivity.kt. With this code you will be declaring _db as class variable for reference to the Database.
lateinit var _db: DatabaseReference
Add the following import to remove the compilation error.
import com.google.firebase.database.DatabaseReference
Now initialise this variable by adding the following line of code to the onCreate function in MainActivity.kt
_db = FirebaseDatabase.getInstance().reference
Create a function to Add Task to Database in MainActivity.kt
Add the following function to the MainActivity class.
fun addTask(){

    //Declare and Initialise the Task
    val task = Task.create()

    //Set Task Description and isDone Status
    task.taskDesc = txtNewTaskDesc.text.toString()
    task.done = false

    //Get the object id for the new task from the Firebase Database
    val newTask = _db.child(Statics.FIREBASE_TASK).push()
    task.objectId = newTask.key

    //Set the values for new task in the firebase using the footer form
    newTask.setValue(task)

    //Hide the footer and show the floating button
    footer.visibility = View.GONE
    fab.visibility = View.VISIBLE

    //Reset the new task description field for reuse.
    txtNewTaskDesc.setText("")

    Toast.makeText(this, "Task added to the list successfully" + task.objectId, Toast.LENGTH_SHORT).show()
}
Add a action handler to the Add Task Button
- Goto MainActivity.kt
- Goto onCreate function.
- Add the below code just after the floating button's action handler.
- Add an action handler to the Add Task button.
- Call addTask() function onClick of Add Task Button.
btnAdd.setOnClickListener{ view ->
    addTask()
}
Set the Database Rules on Firebase Console
As we are just testing we will set the rule as public. To do that just follow the below mentioned steps.
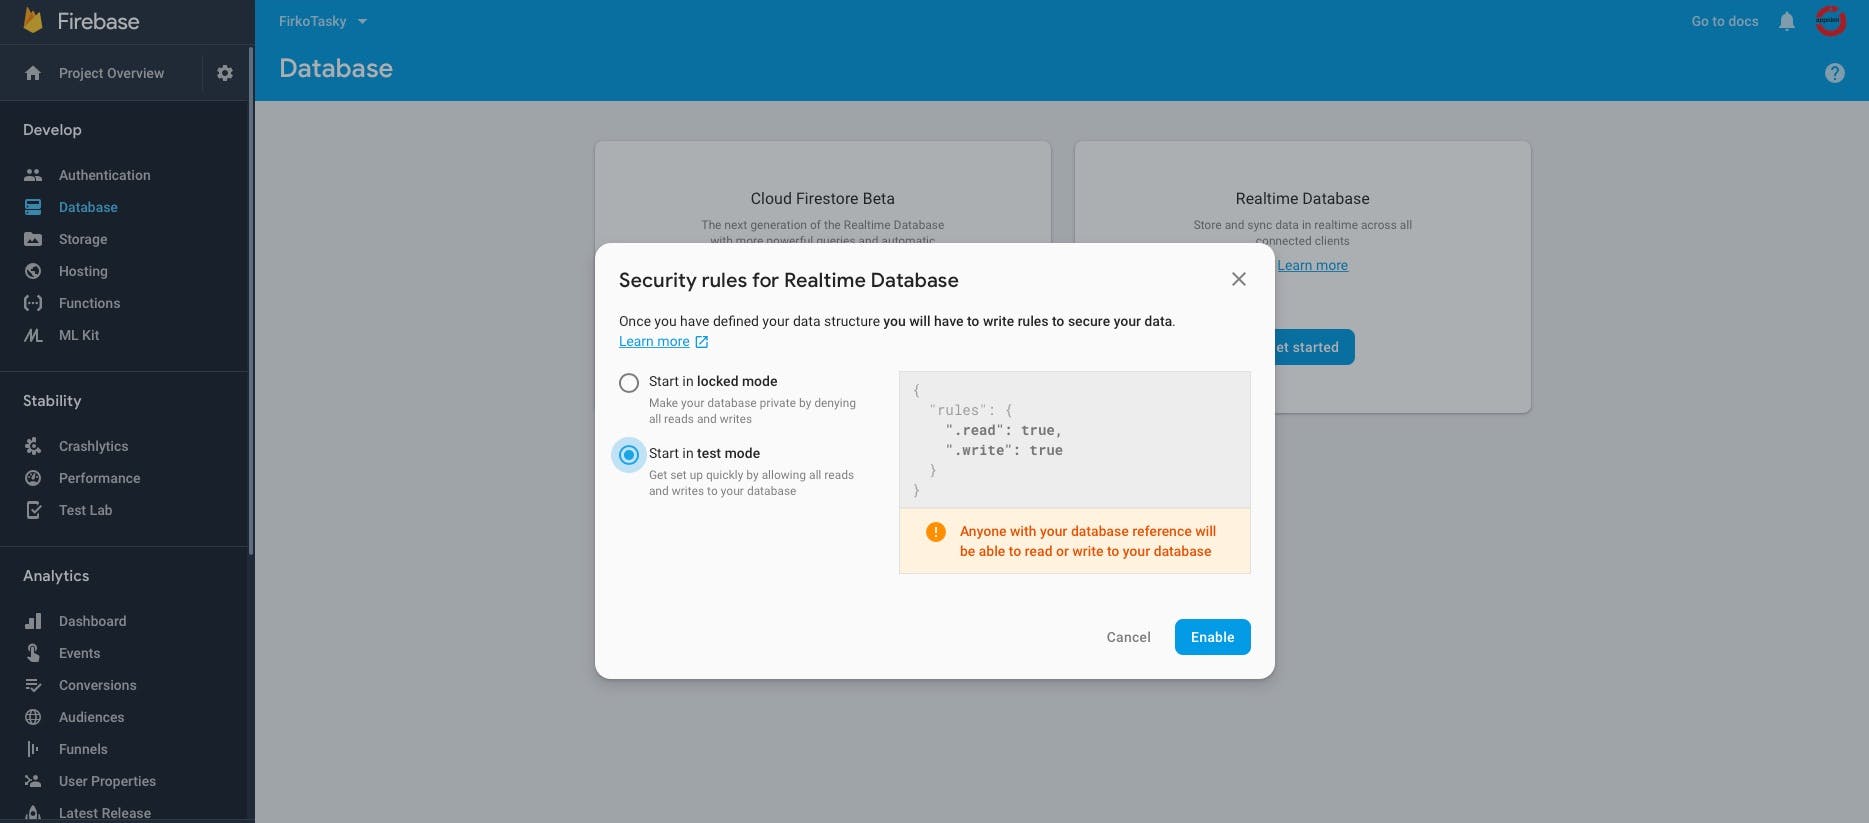
- Goto Firebase Console.
- Select your Project.
- Select Database tab.
- Select Realtime Database.
- Select Start in Test Mode.
- Click on Enable.
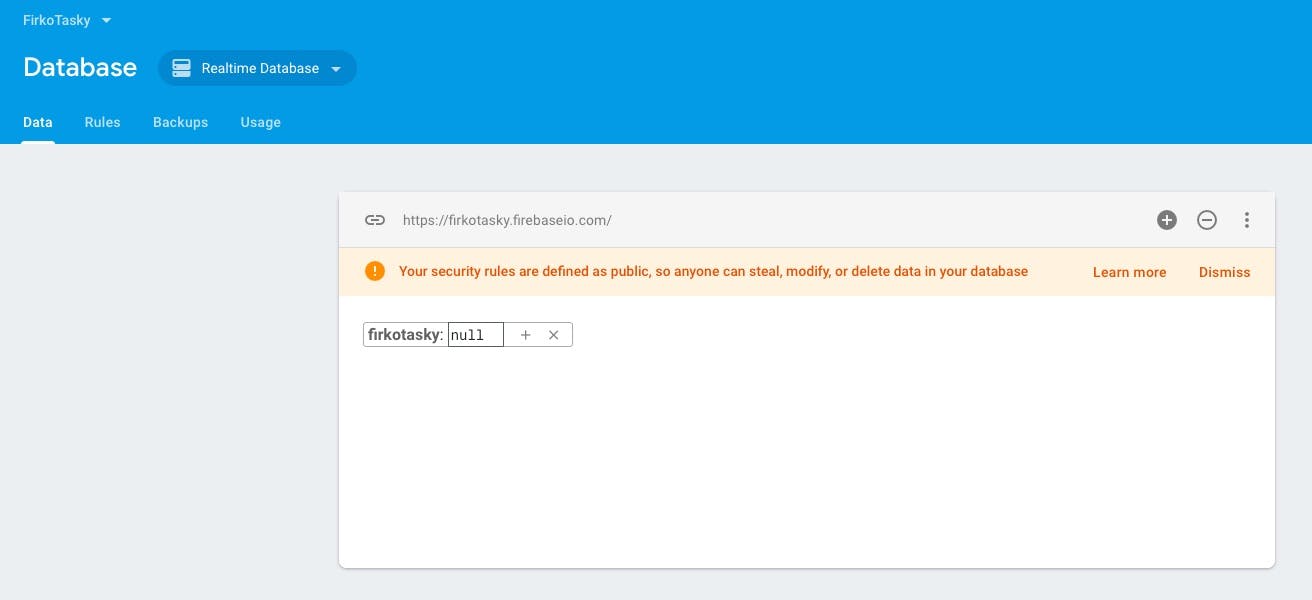
Once done it should look something like this:
Test the Add New Task Feature
Now it is time to run the app once and validate that everthing is working fine. Here are the steps to follow to validate the app.
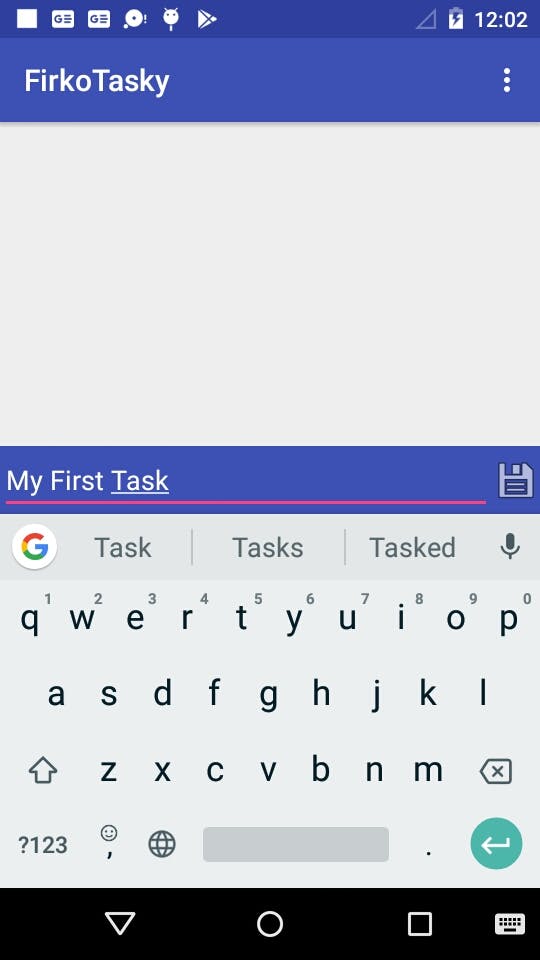
- Run the app.
- Tap on the "+" floating button.
- Footer Form for New Task should become visible.
- Floating Button will hide.
- Fill in the New Task form in the footer.
- Tap on the Add buton on the right in the footer.
- New Task becomes visble in the Firebase Console.
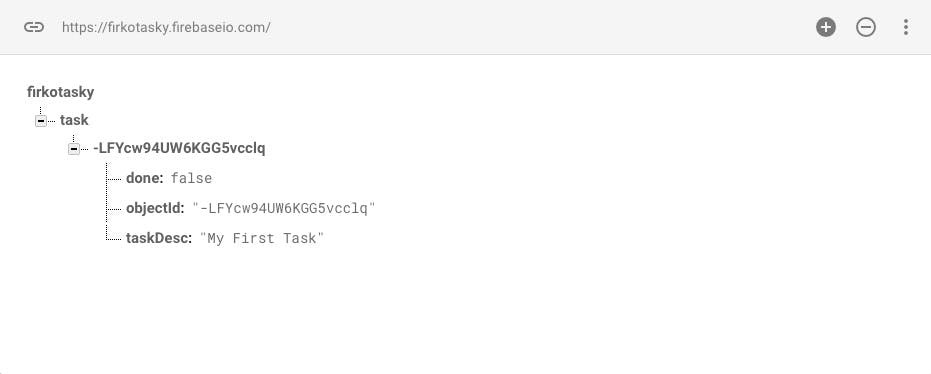
Load Task List from Firebase Realtime Database
We have implemented the feature to add a new task. Now let us load the tasks added to the database to the listview.
Adapter Class for the Task List
The ListView needs an Adapter class to make it work.
Create the Adapter Class
Let us go ahed and create an adapter class that will be set for the list view.
- Goto Project Tab.
- Goto Package "com.appnimiacademy.firkotasky".
- Right Click and Select New and then Select Kolin File/Class. A new popup will come up.
- Name the class as TaskAdapter.
- Set Kind as Class.
- Click on OK.
- Replace the code in the file with the following code.
package com.appnimiacademy.firkotasky

import android.content.Context
import android.view.LayoutInflater
import android.view.View
import android.view.ViewGroup
import android.widget.BaseAdapter
import android.widget.CheckBox
import android.widget.ImageButton
import android.widget.TextView

class TaskAdapter(context: Context, taskList: MutableList) : BaseAdapter() {

    private val _inflater: LayoutInflater = LayoutInflater.from(context)
    private var _taskList = taskList

    override fun getView(position: Int, convertView: View?, parent: ViewGroup?): View {

        val objectId: String = _taskList.get(position).objectId as String
        val itemText: String = _taskList.get(position).taskDesc as String
        val done: Boolean = _taskList.get(position).done as Boolean

        val view: View
        val listRowHolder: ListRowHolder
        if (convertView == null) {
            view = _inflater.inflate(R.layout.task_rows, parent, false)
            listRowHolder = ListRowHolder(view)
            view.tag = listRowHolder
        } else {
            view = convertView
            listRowHolder = view.tag as ListRowHolder
        }

        listRowHolder.desc.text = itemText
        listRowHolder.done.isChecked = done

        return view
    }

    override fun getItem(index: Int): Any {
        return _taskList.get(index)
    }

    override fun getItemId(index: Int): Long {
        return index.toLong()
    }

    override fun getCount(): Int {
        return _taskList.size
    }

    private class ListRowHolder(row: View?) {
        val desc: TextView = row!!.findViewById(R.id.txtTaskDesc) as TextView
        val done: CheckBox = row!!.findViewById(R.id.chkDone) as CheckBox
        val remove: ImageButton = row!!.findViewById(R.id.btnRemove) as ImageButton
    }
}
Declare a class variable for the Adapter in the Main Activity
lateinit var _adapter: TaskAdapter
Initialise the class variable for the Adapeter in the Main Activity
Add the following code in he OnCreate function.
_adapter = TaskAdapter(this, _taskList!!)
Set the Adapter for the Listview in the Main Activity
Add the following code just below the above code.
listviewTask!!.setAdapter(_adapter)
Updating the Listview
Now that the adapter for the listview is set, let us retrieve the data from Firebase Database and load it to the Listview. For that we will have to do some interim operations.
Create a Mutable List to store the task in the MainActivity
Open the MainActivity class and add the following code to declare a variable for TaskList.
var _taskList: MutableList? = null
Initialise the _taskList class variable
Now initialise the variable in OnCreate function.
_taskList = mutableListOf()
Add a function to load the Tasks
Create a function in MainActivity to load the task.
private fun loadTaskList(dataSnapshot: DataSnapshot) {
    Log.d("MainActivity", "loadTaskList")

    val tasks = dataSnapshot.children.iterator()

    //Check if current database contains any collection
    if (tasks.hasNext()) {

        _taskList!!.clear()

        val listIndex = tasks.next()
        val itemsIterator = listIndex.children.iterator()

        //check if the collection has any task or not
        while (itemsIterator.hasNext()) {

            //get current task
            val currentItem = itemsIterator.next()
            val task = Task.create()

            //get current data in a map
            val map = currentItem.getValue() as HashMap<String, Any>

            //key will return the Firebase ID
            task.objectId = currentItem.key
            task.done = map.get("done") as Boolean?
            task.taskDesc = map.get("taskDesc") as String?
            _taskList!!.add(task)
        }
    }

    //alert adapter that has changed
    _adapter.notifyDataSetChanged()

}
Add a Firebase Value Event Listener
Add a class variable for the Value Event Listener to Main Actvity. Call the loadTaskList from the onDataChange function.
var _taskListener: ValueEventListener = object : ValueEventListener {
    override fun onDataChange(dataSnapshot: DataSnapshot) {
        loadTaskList(dataSnapshot)
    }
    override fun onCancelled(databaseError: DatabaseError) {
        // Getting Item failed, log a message
        Log.w("MainActivity", "loadItem:onCancelled", databaseError.toException())
    }
}
Now add the following code at the end in the onCreate function to set the listener.
_db.orderByKey().addValueEventListener(_taskListener)
This is how it looks when the data is loaded to the listview.
Checking/Unchecking of Completed Checkbox
Right now when you check or un check the checkbox for Task Completion Status, you nothing will happen. In this section we will write the code to add the functionality.
Create Task Row Listener Interface
We will need a listener which will listen to the changes to the Task Rows. For that let us first crate an interfaceclass.
- Goto Project Tab.
- Goto Package "com.appnimiacademy.firkotasky".
- Right Click and Select New and then Select Kolin File/Class. A new popup will come up.
- Name the class as TaskRowListener.
- Set Kind as Interface.
- Click on OK.
- Replace the code in the file with the following code.
package com.appnimiacademy.firkotasky

interface TaskRowListener {
    fun onTaskChange(objectId: String, isDone: Boolean)
}
Implement Task Row Listener Interface
Let us implement this interaface on MainActity where we are doing all the operations. Make the change to the class declaration so that it looks like the following:
class MainActivity : AppCompatActivity(), TaskRowListener {
You might get compilation errors as you have not implemented the functions of the interface. To do that add the following function to the end of MainActivity.
Changes for rowListener in the Task Adapter
There needs to be ways in which the listview should be able to convey that that values have changed. To do that you will need to make changes in the Task Adapter.
Add the following class variable to the TaskAdapter.kt class:
private var _rowListener: TaskRowListener = context as TaskRowListener
Now set the listener for the done checkbox in the getView function of Task Adapter class.
listRowHolder.done.setOnClickListener {
    _rowListener.onTaskChange(objectId, !done)
}
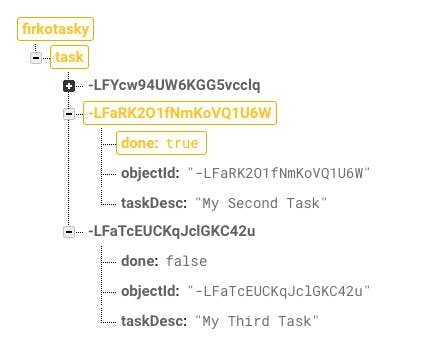
Run the app. Now when you check or uncheck the done check box the item in the Firebase Database changes its value instantly.
Deleting a Task
To delete or remove a task you are required to tap on the thrash icon of the Task row. So let us go ahead and implement the functionality.
Add onTaskDeleted function to the interface
Let us go ahead and add a function to handle task deleted in TaskRowListener Interface. Add this just below the line for onTaskChange
fun onTaskDelete(objectId: String)
Implement the function in MainActivity
override fun onTaskDelete(objectId: String) {
    val task = _db.child(Statics.FIREBASE_TASK).child(objectId)
    task.removeValue()
}
ClickListener for Task Remove Button in Task Adapter
Let us set the listener to handle the clicks on the delete button in the TaskAdapter class.
listRowHolder.remove.setOnClickListener {
    _rowListener.onTaskDelete(objectId) }
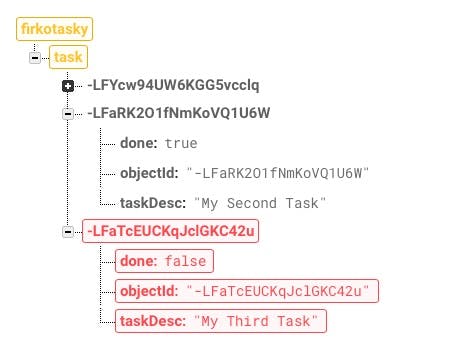
Run the app. Now when you tap on the delete button the item in the Firebase Database is deleted. It is highlighted with red color in the console before it is deleted.
Caching
By default the caching is off for Firebase. You can switch it on by adding the following line of code. For this app you can add it in the OnCreate function. For multiple acticity apps you will need to add it to the Application class.
FirebaseDatabase.getInstance().setPersistenceEnabled(true)
Conclusion
So we come to the end of this tutorial. I hope you liked it more than I loved it researching and writing it.
Firebase is an awesome tool which can help you get started with internet based apps withou any knowledge of server side programming.
Using it wisely can help you launch your apps to the world in no time.