Email Authentication in Unity with PHP and Mysql as Backend
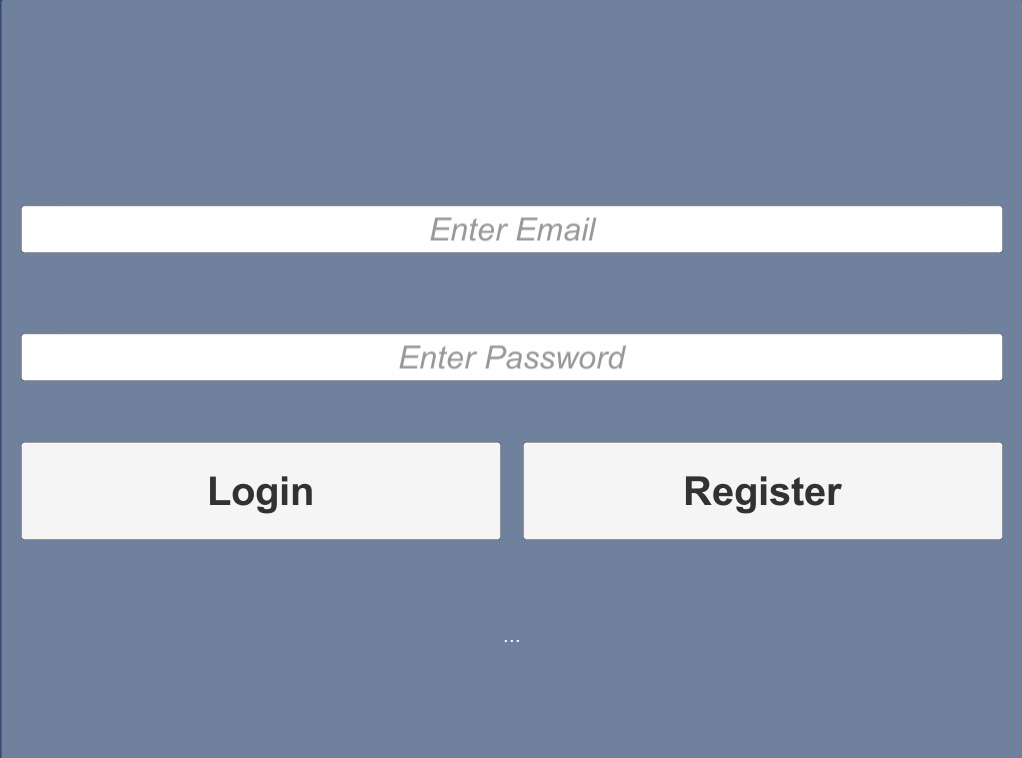
Authentication is one of the basic need for any mobile app. Email and Mobile Numbers are the most commonly used parameters for authentication. In this tutorial you will be discovering how to do Email Authentication in Unity with PHP and Mysql as Backend.
What will you learn?
So this tutorial is ideally suited for some one who is looking to add authentication to a unity based app. Here are some of the stuff which you learn:
- How to design the UI for Email Authentication
- Complete User Registration with PHP and Mysql as backend.
- Email and Password Verification with PHP and Mysql as backend.

Prerequisites
Here are the prerequisites for Email Authentication in Unity with PHP and Mysql.
- Unity should be installed in your system.
- A PHP hosting to host the php scripts.
- Mysql Database to store the user email and password.
Get Source Code
You can get the source file with the complete project files for free. Go ahead and click the below button to get the files. [activecampaign form=89]
Getting Started
To get started with the tutorial you will need to first create a Unity project and then save the default scene.
Creating a new Project in Unity
Here are the steps to create a project in Unity.
- Open the new Project Window in Unity.
- Enter the project name as "Hello Email Auth".
- Select 2D.
- Deselect Analytics.
- Click on Create Project button.

Saving the Scene
- Goto Assets tab.
- Create a folder "Scenes" under the Assets folder.
- Goto Menu.
- Goto File.
- Select Save Scene.
- Name the Scene as "Email Auth" in the popup window.
- Click on the Save button.
The scene will be saved in the "Assets/Scenes" folder

Creating the User Interface
There are several components which needs to be added to create the Email Authentication user interface. You will be discovering them one by one below.
Add a Canvas.
Canvas is the base on which all the UI components will be added. Here are the steps to add a canvas.
- Go to Hierarchy tab.
- Right Click in an empty space in the tab.
- Select the UI in the popup menu.
- Select Canvas.

Add the Main Panel
The main panel will act as the top most panel which will occupy whole screen.
- Go to Hierarchy tab.
- Right Click on Canvas object.
- Select UI in the popup menu.
- Select Panel.

A Panel will be added to the Scene. Now here are some more steps to be done in the inspector.
- Select the panel added in the Hierarchy tab.
- Rename the panel as "Main Panel".
- Goto Rect Transform section in the Inspector.
- Change the Anchor Presets to Stretch, so that the panel occupies the whole canvas.
- [OPTIONAL] You can choose Background Color in the Image Section of the inspector.
- Click on Add Component button at the bottom of the inspector.
- Select Layout in the popup menu.
- Select Vertical Layout Group.
- Set the Padding for left,right, top and bottom as 20.
- Set Spacing as 40.
- Select the Child Control Size Width and Height checkboxes. This is done so that the child components which are to be added will occupy the whole parent.
- Select the Force Expand Width and Height checkboxes. This will make the child components to expand even if the size doesn't matches the panel.

Adding an Input Field for Email
Here are the steps to add the input field for Email.
- Goto Hierarchy tab.
- Right click on the Main Panel.
- Select UI.
- Select Input Field.

An Input field will be added. Now you will need to change some of the properties in the Inspector.
- Goto Hierarchy tab.
- Select the newly added input field.
- Goto Inspector tab.
- Change the name to Email.
- Got Rect Transform Section in the inspector.
- Set the Anchor Presets to Middle and Stretch.
- Goto Input Field section in the inspector.
- Set Content type as Email Address.

Setting Properties of the Placeholder:
- Select the Placeholder object of the this input field in theHierarchy tab.
- Goto the inspector tab.
- Goto the Text section.
- Change the Text property to "Enter Email".
- Set Font Style to Bold.
- Set Font Size to 32.
- Change Paragraph Horizontal Alignment to Centre.
- Change Paragraph Vertical Alignment to Middle.

Setting Properties of the Text object:
- Select the Text object of the this input field in theHierarchy tab.
- Goto the inspector tab.
- Goto the Text section.
- Set Font Style to Bold.
- Set Font Size to 32.
- Change Paragraph Horizontal Alignment to Centre.
- Change Paragraph Vertical Alignment to Middle.

Adding an Input Field for Password
Here are the steps to add the input field for Password.
- Goto Hierarchy tab.
- Right click on the Main Panel.
- Select UI.
- Select Input Field.
An Input field will be added. Now you will need to change some of the properties in the Inspector.
- Goto Hierarchy tab.
- Select the newly added input field.
- Goto Inspector tab.
- Change the name to Email.
- Got Rect Transform Section in the inspector.
- Set the Anchor Presets to Middle and Stretch.
- Goto Input Field section in the inspector.
- Set Content type as Email Address.
- Select the Placeholder object of the this input field in theHierarchy tab.
- Goto the inspector tab.
- Goto the Text section.
- Change the Text property to "Enter Password".
- Set Font Style to Bold.
- Set Font Size to 40.
- Change Paragraph Horizontal Alignment to Centre.
- Change Paragraph Vertical Alignment to Middle.
- Select the Text object of the this input field in theHierarchy tab.
- Goto the inspector tab.
- Goto the Text section.
- Set Font Style to Bold.
- Set Font Size to 32.
- Change Paragraph Horizontal Alignment to Centre.
- Change Paragraph Vertical Alignment to Middle.

Adding a Panel for the Buttons
Before you add the Login and Register buttons, you will need to add another panel which will contain these buttons. Here are the steps to add the container panel.
- Goto Hierarchy tab.
- Right click on the Main Panel.
- Select UI.
- Select Panel.
The panel will be added. Here are the list of changes to be done in the inspector.
- Select the panel added in the last step in the Hierarchy.
- Goto the inspector.
- Change the name to Button Panel.
- Goto the Rect Transform section.
- Set Anchor Presets as Middle and Stretch.
- Set Left and Right as 20 to give slight margin on the either sides.
- Change Height to 100 to match the size of the buttons to be added.
- Click on Add Component at the bottom.
- Select Layouts in the popup dialog.
- Select Horizontal Layout Group.
- Set the spacing parameter as 20.
- Ensure the Width and Height checkboxes for Child Control Size are checked.
- Similarly ensure the Width and Height checkboxes for Child Force Expand are checked.

Adding Login Button
Here are the steps to add a Login button.
- Goto Hierarchy tab.
- Right click on the Buttons Panel.
- Select UI in the popup dialog.
- Select Button.

Now a Button has been added. You will need to work on the inspector tab.
- Select the newly added button in theHierarchy tab.
- Goto the Inspector tab.
- Change the name of the Button to Login Button.
- Now select the child Text object of the Login Button in the Hierarchy tab.
- Goto the inspector tab.
- Goto Text section.
- Change the Text to "Login".
- Set Font Style to Bold.
- Set Font Size to 40.
- Change Paragraph Horizontal Alignment to Centre.
- Change Paragraph Vertical Alignment to Middle.

Adding Register Button
Here are the steps to add a Login button.
- Goto Hierarchy tab.
- Right click on the Buttons Panel.
- Select UI in the popup dialog.
- Select Button.
Now a Button has been added. You will need to work on the inspector tab.
- Select the newly added button in theHierarchy tab.
- Goto the Inspector tab.
- Change the name of the Button to Login Button.
- Now select the child Text object of the Login Button in the Hierarchy tab.
- Goto the inspector tab.
- Goto Text section.
- Change the Text to "Register".
- Set Font Style to Bold.
- Set Font Size to 40.
- Change Paragraph Horizontal Alignment to Centre.
- Change Paragraph Vertical Alignment to Middle.
Adding a Text Box for Showing Response from Backend
Just for debugging purpose you will need to add a Text box to show the response messages from the backend server. Here are the steps to do that.
- Goto Hierarchy tab.
- Right click on the Main Panel.
- Select UI.
- Select Text.
An Input field will be added. Now you will need to change some of the properties in the Inspector.
- Goto Hierarchy tab.
- Select the newly added input field.
- Goto Inspector tab.
- Change the name to Response.
- Got Rect Transform Section in the inspector.
- Set the Anchor Presets to Middle and Stretch.
- Goto the Text section.
- Change the Text property to "...".
- Set Font Style to Bold.
- Set Font Size to 20.
- Change Paragraph Horizontal Alignment to Centre.
- Change Paragraph Vertical Alignment to Middle.
- Set Color to White.

Preparing the Backend
As this tutorial on Email Authentication in Unity with PHP and Mysql, it is required that you have your php hosting with Mysql ready.
Mysql
You will need to add a table to the database. It will hold the email and password of the users. Here is the SQL query to create the table.
\-- --------------------------------------------------------

--
-- Table structure for table \`users\`
--

CREATE TABLE \`users\` (
  \`id\` bigint(10) NOT NULL,
  \`email\` varchar(100) NOT NULL,
  \`pwd\` varchar(20) NOT NULL
) ENGINE=MyISAM DEFAULT CHARSET=latin1;
PHP
Create a php file "auth.php" on your php hosting server. Change the database details in the php file before uploading. Here is the php script
<?php

//These variable values need to be changed by you before deploying
//Variables for connecting to your database.
//These variable values come from your hosting account.
$hostname = "<dbhosturl>";
$username = "<username>";
$dbname = "<dbname>";
$password = "<dbpassword>";

//Connecting to your database
mysql_connect($hostname, $username, $password) OR DIE ("Unable to
connect to database! Please try again later.");
mysql_select_db($dbname);

function login(){

}

function register(){

}

function forgot(){

}

$action = $_GET\['action'\];

if($action == "login"){


    //Fetching from your database table.
    $query = "SELECT \* FROM users where email = '".$_POST\['email'\]."' AND pwd = '".$_POST\['pwd'\]."'";
    $result = mysql_query($query);


    $valid = false;

    if ($result) {
        while($row = mysql_fetch_array($result)) {
            $valid=true;
        }
    }


    if($valid){
        echo '{"success":true,"msg":"User Verified Successfully"}';
    }
    else{
        echo '{"success":false,"msg":"Email and/or Password Invalid"}';
    }

    exit();


}
else if($action == "register"){
    //Fetching from your database table.
    $query = "SELECT \* FROM users where email = '".$_POST\['email'\]."'";
    $result = mysql_query($query);


    $user_exists = false;

    if ($result) {
        while($row = mysql_fetch_array($result)) {
            $user_exists = true;
        }
    }

    if($user_exists){
        echo '{"success":false,"msg":"Users Exists"}';
    }
    else{
        $query = "INSERT INTO users (email,pwd) VALUES ('".$_POST\['email'\]."', '".$_POST\['pwd'\]."')";
        if(mysql_query($query)){
            echo '{"success":true,"msg":"User registered successfully"}';
        }
        else{
            echo '{"success":false,"msg":"Unable to register user"}';
        }


    }

    exit();

}
else if($action == "forgot"){
    //$email = $_POST\['email'\];
    echo '{"success":false,"msg":"Feature not yet implemented"}';


}
else{
    exit();
}
Adding SimpleJson Support
In this tutorial you will be using SimpleJson for parsing the json response from the php server.
Create C# Script for "SimpleJson.cs" in Unity
Here are the step to add the script.
- Got Project tab.
- Create a folder under Assets folder.
- Name the folder as Scripts.
- Create a C# Script under the Scripts Folder.
- Name it SimpleJson.
- Double Click and open "SimpleJson.cs" file in MonoDevelop for editing.

Editing the Script in MonoDevelop
Double Click and open "SimpleJson.cs" file in MonoDevelop for editing. Once the file is open in MonoDevelop, replace the code with the code of SimpleJson.cs at the following location.
http://wiki.unity3d.com/index.php/SimpleJSON


Adding Script for Email Authentication
Now that the UI and Backend is ready, it is time to write the scripts for authentication.
Create C# Script for "AuthManager.cs" in Unity
Here are the step to add the script.
- Got Project tab.
- Create a folder under Assets folder.
- Name the folder as Scripts.
- Create a C# Script under the Scripts Folder.
- Name it AuthManager.
- Double Click and open "AuthManager.cs" file in MonoDevelop for editing.

Editing the Script in MonoDevelop
Double Click and open "AuthManager.cs" file in MonoDevelop for editing.
Once the file is open in MonoDevelop, replace the code with the below code. Make sure you change the value of "authphpurl" as per your hosting details.
using System.Collections;
using System.Collections.Generic;
using UnityEngine;
using UnityEngine.UI;
using UnityEngine.Networking;
using SimpleJSON;

public class AuthManager : MonoBehaviour {

    public Text emailText;
    public Text passwordText;
    public Text responseText;

    string authphpurl = "http://yourserver.com/php/auth.php";//enter the complete url for auth.php

    // Use this for initialization
    void Start () {

    }

    // Update is called once per frame
    void Update () {

    }

    public void handleLoginButtonClick(){
        StartCoroutine(PostDataForLogin ());
    }

    public void handleRegisterButtonClick(){
        StartCoroutine(PostDataForRegister ());
    }

    IEnumerator PostDataForLogin(){
        Debug.Log("PostDataForLogin!");

        WWWForm form = new WWWForm();
        form.AddField("email", emailText.text);
        form.AddField("pwd", passwordText.text);

        var url = authphpurl+"?action=login";

        UnityWebRequest www = UnityWebRequest.Post(url, form);

        yield return www.SendWebRequest();

        Debug.Log ("Response:"+www.downloadHandler.text);

        if(www.isNetworkError || www.isHttpError) {
            Debug.Log(www.error);
            responseText.text = www.error;
        }
        else {

            Debug.Log("Form upload complete!");

            JSONNode jsonNode = SimpleJSON.JSON.Parse(www.downloadHandler.text);
            Debug.Log("success : "+jsonNode\["success"\]);
            Debug.Log("message : "+jsonNode\["msg"\]);

            responseText.text = jsonNode \["msg"\];
        }

    }

    IEnumerator PostDataForRegister(){
        Debug.Log("PostDataForRegister!");

        WWWForm form = new WWWForm();
        form.AddField("email", emailText.text);
        form.AddField("pwd", passwordText.text);

        var url = authphpurl+"?action=register";

        UnityWebRequest www = UnityWebRequest.Post(url, form);

        yield return www.SendWebRequest();

        Debug.Log ("Response:"+www.downloadHandler.text);

        if(www.isNetworkError || www.isHttpError) {
            Debug.Log(www.error);
            responseText.text = www.error;
        }
        else {

            Debug.Log("Form upload complete!");

            JSONNode jsonNode = SimpleJSON.JSON.Parse(www.downloadHandler.text);
            Debug.Log("success : "+jsonNode\["success"\]);
            Debug.Log("message : "+jsonNode\["msg"\]);

            responseText.text = jsonNode \["msg"\];
        }

    }

}
Connecting the UI to the Script
Now that the UI and the scripts are ready, you can start integrating them.
Adding an Empty Game Object for the script
You will need to add an empty game object to hold the AuthManager script. Here are the steps the do that.

- Goto Hierarchy tab.
- Select Create Empty in the Create menu.
- An object with name GameObject will be added to the Hierarchy.
- Select the GameObject just created.
- Goto the inspector tab.
- Click on Add Component.
- Select Scripts in the popup dialog.
- Select AuthManager.

Now the AuthManager script ready to be used.
Setting the UI Outlets in AuthManager script
Here are the steps to set the outlets.
- Goto Hierarchy tab.
- Select GameObject.
- Goto Inspector tab.
- Lock the inspector by click on the lock button on the top right of the tab.
- Goto Hierarchy tab.
- Select and Expand Email Input Field.
- Select the child Text of Email Input Field.
- Drag the Text object.
- Drop the Text Object on the Email Text field of the Auth Manager script in the inspector tab.
- Similarly, select and expand Password Input Field.
- Select the child Text ofPassword Input Field.
- Drag the Text object.
- Drop the Text Object on the Password Text field of the Auth Manager script in the inspector tab.
- Next, select the Response Text object in the Hierarchy tab.
- Drag the Text object.
- Drop the Text Object on the Response Text field of the Auth Manager script in the inspector tab.
- Goto inspector tab.
- Unlock the inspector tab.

Now all the three outlets are set.
Adding OnClick Event Handler for Login Button
Here are the steps to add the event handler.
- Goto Hierarchy tab.
- Select Login Button object.
- Goto inspector tab.
- Goto Button section.
- Click on + button in the On Click() section.
- Goto Hierarchy tab.
- Drag GameObject from Hierarchy tab.
- Drop GameObject to the Object field in the OnClick() section in the inspector.
- Select AuthManager.handleLoginButtonClick in the drop down in the OnClick() section.

The OnClick event handler is now ready for Login button.
Adding OnClick Event Handler for Register Button
Here are the steps to add the event handler.
- Goto Hierarchy tab.
- Select Register Button object.
- Goto inspector tab.
- Goto Button section.
- Click on + button in the On Click() section.
- Goto Hierarchy tab.
- Drag GameObject from Hierarchy tab.
- Drop GameObject to the Object field in the OnClick() section in the inspector.
- Select AuthManager.handleRegisterButtonClick in the drop down in the OnClick() section.

The OnClick event handler is now ready for Login button.
Running the App
Now you can go ahead and run the app by clicking on the play button on top. You should be able to register a user. After that use the same credentials to login.
What's Next?
Now that you have got your Email Authentication ready, you can start adding more scenes to this project. Gradually this project can take shape of a professional app. You can download the complete source code at the starting of this tutorial.
If you have any query or if the tutorial has helped you in any way, just add a comment below.

